Below is a short list of guidelines and instructions, regarding shooting and uploading video or audio clips for our Live streaming Webcast.
How to Record a Video - "Quick Start":
if you are unsure how to do this, then here is a 'Quick Start" guide.
- Today, mobile phones are great at shooting videos, but need to be held still or propped against something.
- Tablet devices are also ideal to use.
- A Windows 10 computer with a camera, i.e. a laptop, also has a built-in Video recorder, which could be used. Click here for Windows 10 Instructions.
- Although ZOOM could be used, it does produce a lower quality audio and visual outcome, so this is not recommended, but could be used if necessary.
Shooting the Video clip:
Here are a few hints and Tips for the best result. Some may appear obvious, sorry.
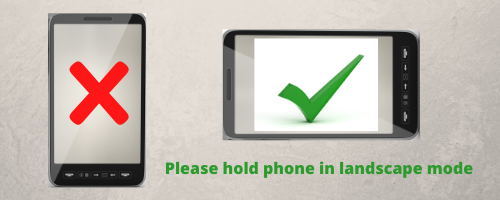
- Shoot the video in Landscape mode rather than portrait mode, as this displays better on TVs, laptops etc.
 Try not leave it until the last minute as the Production team needs to check it out, make sure it has uploaded correctly etc.
- Aim for upper body / head shots with a pleasant background.
- Talk a bit louder to ensure that the sound carries to the microphone of the recording device.
- Make sure you read through it a few times, to get the flow and contact, before pressing RECORD.
- Try to pick a non windy, no echoing area for your recording.
- Also try to eliminate distractions as much as possible, for you and the viewer.
- Check that the lighting as even as possible and there are no obvious shadows or bight light causing large contrasts.
- Try to look forward (to read) rather than looking down - faces are nicer than tops of heads.
- Do a simple test or two to see how it looks and sounds.
- When you are happy with the videos or recordings, follow the Instructions below to upload them to an area that our Production Team can access them.
For those who are already a Dropbox User, feel free to place them in a folder in your Dropbox area and share a link to your video files or folder, for us to access. - There are some good hints and tips here as well.
Uploading the video - There are many options!
| Good Options to choose! | Results in some loss of quality! | |||||
 |
 |
 |
 |
 Messeneger |
 |
 |
Yes it often takes a few attempts or "takes" to end up with the final video clip.
Once you are happy with the result the next step it to get it to the Freeway Production Team.
Try to do this early to mid week so that the team can check that all is OK and they have time to add words etc.
NB: Email is usually NOT an option, due to the typical size of the video, unlkess it is quite a short clip.
- OneDrive - Straight to a Freeway cloud location (refer below).
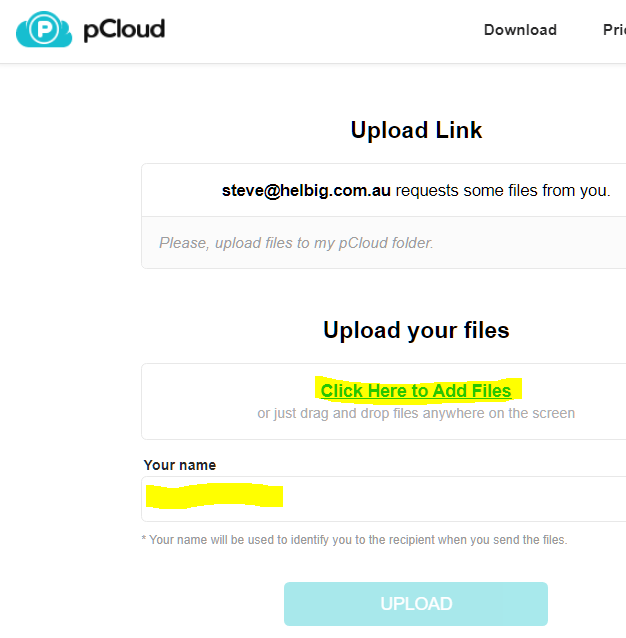
- pCloud - Also straight to a Freeway accessible cloud location (refer below)
- Dropbox - If you use this then simply share the file link of your video with webcasts@freewaybaptist.org.au
- Google Drive - Those who use Google Drive could share a link to their video
- Facebook Messenger - possible, but not ideal as it will need to be then relayed to the production team.
- Google Photos - If you use this facility and have managed to upload your video to this, then simple send us a link to the video
- WhatsApp, also possible, but produces a compressed quality result, and also then needs to be on-forwarded to the production team.
 Option 1: Uploading to OneDrive (for Microsoft Account users)
If you are familiar with OneDrive or have a Microsoft Account, then do the following. Otherwise use the second "pCloud" Option
- Go to our Uploads Inbox:
- Click on the Folder to receive the video (e.g. ... "Readings".
- Click the Upload link.
- Select Files (from drop-down).
- If prompted, Login to Microsoft using an existing Email, phone or Skype name
(Or create a free account). - Browse to the Folder containing the video.
- Select the right one.
- Select Upload.
- and WAIT for it to complete! Videos do take a while to upload, depending on their size and your internet connection!).
- Send a message to webcasts@freewaybaptist.org.au to confirm that this has been done, and we will check it.
or if you prefer, or are using a mobile, following the steps below
 Option 2: Uploading to pCloud (for anyone else)
- Go to this link on your computer or mobile
- Click the "click here to add files" link
- Browse to where the video is and select it
- Enter your name and the Upload button will become available
- Click the upload button
- and WAIT for it to complete! Videos do take a while to upload, depending on their size and your internet connection!)
- Send a message to webcasts@freewaybaptist.org.au to confirm that this has been done, and we will check it.

Important:
Whichever upload method you use...
Remember to wait for the upload to finish!
It could take quite a few minutes depending on the size of the file.

 This page is currently private and not in a menu.
